


Tired of weak chisels delaying your projects?
When you work in heavy-duty construction or supply tools to professional contractors. You need efficiency, zero-complaint reliability, and stable performance. If you are dealing with concrete, brick, or stone, the SDS chisel is your primary choice.
Using an SDS chisel correctly saves time, prevents machine damage, and ensures the safety of the operator. Whether you are an importer, a wholesaler, or an end-user, understanding the exact operation and technical specifications of this tool gives you a massive advantage.
What is SDS Chisel?
An SDS (Slotted Drive System) chisel is a heavy-duty demolition accessory designed specifically for rotary hammers.
Originally developed by Bosch in the 1970s, the SDS design solved a major problem: drill bits and chisels slipping inside the chuck during high-impact work.
When you look at the shank (the bottom part) of an SDS chisel, you will see a specific pattern of slots and grooves. Here is why those slots matter:
- The Grooves: These allow the chisel to lock securely into the chuck. The tool cannot fall out.
- The Slots: These allow the chisel to slide back and forth independently of the chuck.
Because the chisel slides freely on its own axis, the piston of the rotary hammer strikes the end of the chisel directly. You can get 100% of the impact energy transferred straight to the concrete.
Material and Manufacturing Quality
For professional-grade applications, you cannot rely on cheap steel. High-quality SDS chisels, like those manufactured by reliable suppliers such as Tenyu Tool, are forged from premium 40Cr or 42CrMo alloy steel.
To achieve a "No-Complaint" standard, these chisels undergo rigorous industrial processes:
- Drop Forging: Shapes the steel and aligns the grain structure for maximum strength.1
- Tratamiento térmico en baño de sales: Ensures uniform hardness across the entire chisel, preventing snapping under extreme stress.
- Shot Peening: Compresses the surface of the steel, eliminating micro-cracks and extending fatigue life.
When you purchase or use an SDS chisel built this way, you guarantee stable lead times on your projects because the tools do not break prematurely.
What are the Different Types of SDS Chisels?
You cannot use one chisel for every job. Using the wrong chisel type slows down your work and ruins the tool. You must match the chisel head to the specific demolition task.
Here are the primary type of SDS chisels you need to know:
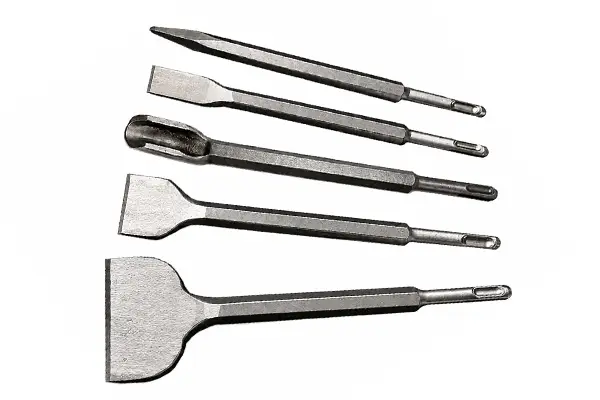
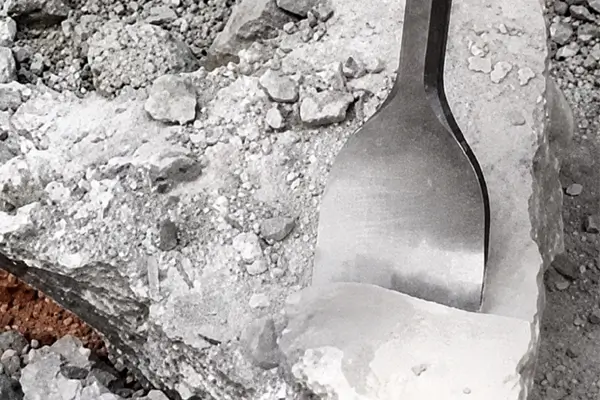
1. Pointed Chisel (Bull Point)
- Diseño: One sharp, conical point.
- Función: Focuses 100% of the hammer's energy into a tiny surface area.2
- Lo mejor para: Starting holes in concrete, general breaking, and destroying heavily reinforced concrete slabs.
2. Flat Chisel
- Diseño: A flat, wedge-shaped cutting edge.
- Función: Directs the breaking force in a straight line.
- Lo mejor para: Chipping away concrete, edging, and cutting straight lines in asphalt or masonry.
3. Scaling Chisel (Spade Chisel)
- Diseño: Much wider than a standard flat chisel (usually 1.5 to 3 inches wide).
- Función: Covers more surface area but with less penetrating depth.
- Lo mejor para: Removing scale, rust, weld spatter, plaster, and thin concrete layer .
4. Gouging Chisel
- Diseño: A half-moon or U-shaped cutting edge.
- Función: Carves out round channels.
- Lo mejor para: Cutting narrow channels in masonry for electrical wiring or plumbing pipes.
5. Tile Chisel
- Diseño: Similar to a scaling chisel but with an angled working end.
- Función: Slides easily under tiles without damaging the wall or floor behind them.
- Lo mejor para: Removing ceramic, porcelain, or vinyl tiles quickly.
SDS Chisel Selection Guide
| Chisel Type | Aplicación principal | Recommended Shank | Relative Lifespan |
|---|---|---|---|
| Pointed | Demolishing concrete slabs, starting holes | SDS Plus / SDS Max | Extremadamente alto |
| Flat | Edging, directional chipping, brickwork | SDS Plus / SDS Max | Alta |
| Spade/Wide | Removing plaster, asphalt, dried mortar | SDS Plus / SDS Max | Medium (Requires sharpening) |
| Gouging | Digging channels for pipes and wires | SDS Plus | Alta |
| Tile Removal | Lifting floor and wall tiles | SDS Plus | Medio |
Can a Hammer Drill be Used as a Chisel?
This is a very common question, and the answer requires strict clarification. No, you cannot use a standard hammer drill as a chisel.
You must understand the difference between a standard hammer drill and a rotary hammer.
The Standard Hammer Drill
A standard hammer drill creates its hammering action using two ribbed metal discs (cam plates) that click rapidly against each other as the chuck spins.
- It relies on mechanical vibration.
- The impact energy is very low.
- Crucially, the chuck never stops spinning.
If you put a chisel into a tool that constantly spins, you will merely scratch the wall while twisting your wrists dangerously3.
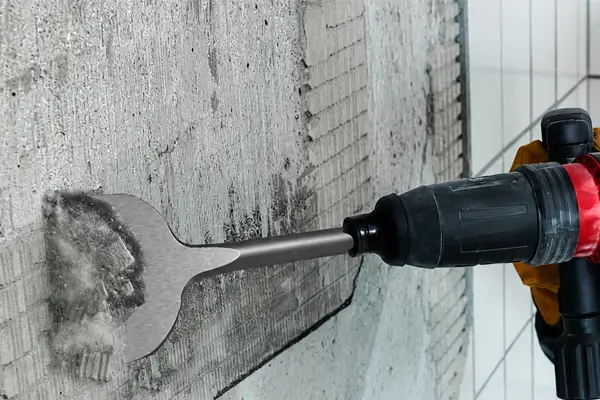
The Rotary Hammer
To use an SDS chisel, you must use Rotary Hammer. A rotary hammer uses an electro-pneumatic piston system to generate massive impact energy (measured in Joules). More importantly, rotary hammers feature a specific model dial.
To use a chisel, you must switch the rotary hammer to "Hammer-Only" mode (usually indicated by a hammer icon without a drill bit). In this mode:
- The rotation is completely locked.
- The piston fires rapidly, driving the chisel forward.
- You get pure, unadulterated chipping power.
Summary: Do not attempt to chisel with a standard hammer drill. You will destroy the tool and waste your time. You must use a rotary hammer in rotation-stop mode.
Can I use an SDS Chisel with Any Hammer Drill?
No. You can only use an SDS chisel with a rotary hammer that has a matching SDS chuck.
Furthermore, not all SDS chucks are the same. You must match the exact shank type of your chisel to the chuck of your machine. If you are an importer or wholesaler, you must ensure you are supplying the correct shank type for your target market's machines.
There are two main types of SDS systems dominating the market today:
1. SDS Plus
- Shank Diameter: 10 mm.
- Machine Size: Light to medium-duty rotary hammers (usually 2 to 4 kg machines).
- Aplicación: Removing tiles, chasing cables, chipping brick, and light concrete demolition.
- Comprobación visual: The shank has two open grooves and two closed slot4.
2. SDS Max
- Shank Diameter: 18 mm.
- Machine Size: Heavy-duty rotary hammers and demolition breakers (5 kgs and above).
- Aplicación: Heavy concrete foundation demolition, asphalt breaking, and intense structural work.
- Comprobación visual: The shank is visibly thicker, featuring three open grooves and two closed slots.
What Happens if You Mismatch?
- You cannot fit an SDS Max chisel into an SDS Plus chuck. It is physically impossible.
- You puede technically buy an adapter to fit an SDS Plus chisel into an SDS Max machine. However, you should avoid this. The massive impact energy of an SDS Max machine will quickly snap the thinner 10mm shank of the SDS Plus chisel.
For a zero-complaint experience, always buy and use chisels that naturally match the chuck of your rotary hammer.
Step-by-Step: How to Use an SDS Chisel Safely and Efficiently
Knowing the types and compatibility is only half the battle. Executing the job properly ensures you get the maximum lifespan out of your tools while protecting yourself from injury.
Follow this strict procedure to operate your SDS chisel.
Step 1: Pre-Operation Inspection
Before you touch the wall, inspect your equipment.
- Check the Chisel Head: Is the pointed chisel actually pointed? Is the flat chisel dull or chipped? A dull chisel forces the rotary hammer to work twice as hard, leading to motor burnout.
- Check the Shank: Wipe the SDS shank clean with a rag. Dirt and concrete dust act like sandpaper inside the chuck.5
- Lubrica: Apply a very small drop of specialized SDS grease to the grooves of the shank. This reduces friction, prevents overheating, and extends the life of your expensive rotary hammer chuck.
Step 2: Proper Insertion
- Pull back the collar on your rotary hammer's chuck.
- Insert the greased SDS chisel shank into the hole.
- Twist the chisel slightly until you feel the slots align with the internal ball bearings of the chuck.
- Push it in until it clicks.
- The Pull Test: Tug firmly on the chisel. It should slide back and forth by about an inch, but it must not pull out of the chuck completely.
Step 3: Setting the Machine
- Locate the mode selector dial on your rotary hammer.
- Turn the dial to the Hammer-Only setting (the icon of a hammer).
- Note: Many professional machines have an intermediate setting called "Vario-Lock" (an icon of a chisel with a circular arrow). This setting allows you to freely rotate the flat or tile chisel into the exact angle you need. Once you find the perfect angle, switch the dial completely to the Hammer-Only setting to lock that angle in place.
Step 4: Execution and Posture
- Wear PPE: Always wear ANSI-rated safety goggles, thick work gloves, steel-toed boots, and heavy-duty dust masks (or respirators). Concrete dust contains silica, which is lethal to your lungs over time.
- Angle of Attack: Never drive the chisel into a massive block of concrete at a direct 90-degree angle. The chisel will get hopelessly stuck. Instead, approach the concrete at a 30 to 45-degree angle.
- Work from the Edge: Always start breaking concrete near an edge or a crack. Work inwards. Do not try to break the dead center of a slab first.
- Do Not Push Hard: This is the most common mistake. You do not need to push your body weight into the machine. The electro-pneumatic piston inside the rotary hammer does 100% of the work. If you push too hard, you compress the internal shock absorbers, which actually reduces the impact energy and burns out the motor. Just apply enough pressure to keep the chisel from bouncing around.
Step 5: Heat Management
Friction generates extreme heat. If you chisel continuously for 20 minutes, the steel will become hot enough to cause severe burns.
- Never touch the chisel bare-handed immediately after using.
- Do not dip a blazing hot chisel into a bucket of cold water to cool it down. This rapid thermal shock makes the alloy steel brittle, guaranteeing it will shatter on your next job. Let it cool naturally in the ambient air.
Conclusión
Mastering how to use an SDS chisel comes down to understanding the mechanics of the Slotted Drive System, selecting the correct head profile for your specific material, and letting the rotary hammer do the heavy lifting.
By matching SDS Plus tools with lighter tasks and SDS Max tools with heavy demolition, protect your machinery and speed up your workflow.
If you manage purchasing for a hardware brand or import B2B construction tools, prioritizing high-quality steel, proper heat treatment, and precise forging is non-negotiable. Partnering with a professional manufacturer like Tenyu Tool guarantees you deliver that highly sought-after "Zero-Complaint" quality to your end-users, backed by a stable lead time that keeps your supply chain moving profitably. Ensure you equip yourself with the right knowledge, the right safety gear, and the highest grade chisels on the market.
FAQ: Frequently Asked Questions about SDS Chisels
1. Why does my SDS chisel keep getting stuck in the concrete? You are likely driving the chisel straight down (at a 90-degree angle) directly into the center of a slab. Concrete compresses the tool. To fix this, always attack the concrete at a 45-degree angle and work inward from the outer edges.
2. Can I sharpen a dull SDS flat or spade chisel? Yes. You can use an angle grinder or a bench grinder to restore the cutting edge. However, you must grind slowly and pause frequently. If the steel turns blue from grinding heat, you have ruined the heat treatment, and the edge will become brittle.
3. Do I really need to grease the SDS shank every time? You do not need to grease it every single time you swap a bit, but you should apply a small amount of grease before every major working session. Dry friction between the shank and the chuck rapidly wears out the internal ball bearings of your rotary hammer, leading to costly repairs.
4. What is the difference between a scaling chisel and a tile chisel? While they look similar, a tile chisel has a slightly bent or angled head. This ergonomic curve allows you to keep the rotary hammer away from the wall while the flat edge slides cleanly behind the tile. A scaling chisel is completely straight.
5. How long should a high-quality SDS chisel last? A premium 40Cr steel chisel subjected to proper salt bath heat treatment will last for hundreds of hours of direct impact. However, the lifespan drastically shortens if you pry with the chisel (using it like a crowbar) or push too hard, which causes the shank to snap under bending stress. Let the impact do the breaking, not your leverage.
"Metallurgical references describe forging as a process that can orient grain flow and improve mechanical properties such as strength and toughness in steel components. Evidence role: mechanism; source type: education. Supports: Drop forging shapes steel and aligns grain structure in a way that improves strength.. Scope note: This supports the general materials-science mechanism, not the performance of a specific SDS chisel design or manufacturer. ↩
"A mechanics or engineering source can support the underlying principle that reducing the contact area of an impact tool increases contact pressure and local stress concentration, which aids fracture initiation; it would not verify the literal claim that 100% of hammer energy is transferred to the surface. Evidence role: mechanism; source type: education. Supports: A sharp conical point concentrates impact force over a very small area, increasing local pressure and helping initiate fracture.. Scope note: Supports the pressure/stress-concentration mechanism, but the “100%” energy-transfer wording is an overstatement because real impacts lose energy to heat, vibration, rebound, and deformation. ↩
"Occupational-safety material on powered hand tools identifies drill kickback and reaction torque as hazards that can injure the hands, wrists, or arms, providing safety context for the warning about wrist twisting. Evidence role: general_support; source type: government. Supports: Using a spinning drill inappropriately can create dangerous wrist-twisting torque.. Scope note: The source would support the general torque-related injury risk of rotating drills, not necessarily the exact scenario of inserting a chisel into a hammer drill. ↩
"A neutral reference on SDS-plus shank geometry supports that the SDS-plus interface has four longitudinal features, including two open drive grooves and two closed locking grooves; terminology varies, and some sources may describe the closed features as grooves or slots rather than using the exact wording in the article. Evidence role: definition; source type: encyclopedia. Supports: An SDS-plus shank can be identified visually by two open grooves and two closed slots.. Scope note: The source verifies the shank geometry but may not use the exact phrase “closed slot.” ↩
"A tribology or materials source should substantiate that hard mineral particles such as silica-rich concrete dust can cause three-body abrasive wear in moving mechanical contacts, providing contextual support for the warning about dust inside a chuck. Evidence role: mechanism; source type: paper. Supports: Dirt and concrete dust can abrade the internal contact surfaces of a rotary hammer chuck.. Scope note: This would support the abrasive-wear mechanism generally, not necessarily measured wear rates for a specific SDS chuck model. ↩